
Designing My Tiny House... For Free!
- Annie
- Aug 23, 2018
- 19 min read
Updated: Oct 16, 2018
How I conceived, designed, and created precise floorplans and 3D renderings for the house of my dreams. For ZERO dollars. Here is my condensed guide on where to look for inspiration, some key decisions you'll want to make first, and how to get started on your actual design.
Upfront Disclaimer: If it wasn’t already evident, I am not an expert. Other than a lot of art classes in high school and college, and a natural interest in being creative, I have no formal design training. I have finished the design of my tiny house, but I am just getting ready to start my build, so please read the following with the understanding that I know I still have a lot to learn and plenty of mistakes to make along the way. I can only hope that by detailing my own process thus far, I can help other people get inspired for their own journey! I will keep this post updated as my build process continues.
From the moment I got the idea in my head to design and build my own tiny house, I. Was. Obsessed. That first night I stayed up until 3 or 4am, researching and watching videos and sketching and making lists, on and on until I fell straight asleep on the couch. Through the following weeks, I continued to educate myself on whatever resources I could find - blogs, podcasts, documentaries, tv shows, books and more. With this blog, my hope is to condense those sources and thoughts into one place to provide some context as to why I made the design decisions I did, and for anyone else out there hoping to build a tiny house to be inspired to make some moves in the right direction.
My initial thought process was very scattered, so I’ve tried to organize the post below into a more logical format, working from general inspiration into decision making, then into design. (There will also be another post coming about all of the decisions I've made about designing the interior of the house, I couldn't cover it all in one post!)

PRE-DESIGN: Initial Research and Inspiration
With the advent of the internet, an overwhelmingly wide world of information is at your fingertips at any time of the day. So where do you go first to educate or inspire yourself? I’ve compiled the things I found most helpful below!
With big, impossible-seeming dreams like this one, you need all the help and inspiration you can get. Here's a list of the things that got me started, and then kept me going when things got tough.
Instagram + Pinterest
For me, the first spark of an idea for my tiny house came from endless scrolling on Instagram, and oh MAN what a bottomless well of inspiration it can be. Normally I would say the more accounts you look at, the better, but be wary of flooding your feed with quantity before checking out the quality. This may sound like plain ol’ common sense, but before just hitting ‘follow’ on every account about tiny living that pops up, take the time to click through a few posts and make sure their content will be helpful to you. There are tons of ‘inspiration accounts’ that just share content from other accounts instead of creating their own. Those are great as a start, but as my interest grew I found myself wanting the context behind the images. In general, I get the best information from people who are either in the process of building their own home, or who have completed their DIY homes and are documenting their day-to-day life. Watching their journeys not only provides inspiration for my own process, but also provides some realistic context for the bumps I’m likely to face along the way, and smart decisions they made that I can replicate.
Some of my favorite accounts:
Her Tiny Home | Tiny House Expedition | Tiny House, Giant Journey | Finally Tiny | Chloe Barcelou | Building Tiny Auckland | Cleo the Micro
[I also have about 1,000 favorite van-life/converted RV/renovated Airstream accounts, but for the purpose of this post, I'm focusing on the more "traditional" tiny-housers. I know, I know - tiny living is not about 'traditional' anything. Just trying to stay focused so this post doesn't get any longer than it already is!]
I’ll be honest, I am just not a Pinterest kind of person. I have an account and I’ve tried to use it, but it always turns into an unproductive kind of rabbit hole where I feel like I’m looking at a LOT of content, but not actually learning anything. And it is SO easy to fall down a different rabbit hole entirely and spend an hour looking at DIY tomato planters instead. But some people love it! And if that’s you, there is certainly plenty of design inspiration. As always, be wary of photos without an original source! A few times I’ve wanted to know more about a particular feature of a project or just to see more photos of an interesting home, only to find when I clicked through that the photo was not linked to its original website, so I was at a dead end. But if Pinterest works for you, pin away!
TV Shows + Documentaries
There is a LOT of content out there, so I’ll just go through some highlights of things you should definitely watch, and the stuff you could probably just skip.
Tiny House, Big Living (TV show, HGTV/DIY Network) - My favorite! No cheesy set-ups or seemingly scripted ‘uh-oh’ moments. Each show documents real people throughout the process of their design and build. Some self build, some work with a professional, some do a combination of both.
Tiny House Nation (TV show, FYI Network) - I’ll watch it if it’s on because they do build some beautiful houses, but otherwise, not my fave. With these kinds of design shows, anything that feels too scripted, stilted, or formulaic just drives me nuts, and there’s a LOT of it in Tiny House Nation.
Tiny House Hunters (TV show, HGTV/DIY Network) - I do like that this show displays a wider variety of the types of small houses people can look into: house boats, converted RVs, smaller condos, etc. But there’s that same level of stilted conversation that keeps anything from seeming genuine (I have this issue with all of the House Hunter shows!). And the home buyer also seems to ALWAYS bring along the one family member or friend who spends the entire time going “haha where’s the rest of the house? How can anyone live here? You’re not SERIOUSLY going to buy this place are you?” I get that conflict drives good television, y’all, but that trope gets old VERY fast.
Minimalism (documentary, available on Netflix) - Definitely worth watching to get ready to downsize. But be aware that the whole thing skews very strongly towards a narrative of very privileged, mostly white people giving up their six figure jobs and big houses to travel full time or live in a tiny house. Oh, wouldn’t we all love to be able to do that? I appreciate the spirit of the documentary but wish it was approached with a broader perspective.
Living Tiny Legally (documentary, available on YouTube) - Put together by the amazing folks at Tiny House Expedition, this two part documentary is INCREDIBLY informative if you want to know more about the legal issues that come into play when you decide to go tiny. There are two parts, so in total, it’s about two and a half hours of content, but it’s very worth your time. These guys film lots of tiny house documentary-style features, so follow them on Instagram and YouTube to get even more content!
Small is Beautiful (documentary, available on YouTube) - This documentary is beautifully shot, features incredible interviews, and covers a LOT of ground. It definitely lit a fire under my butt to get moving on my tiny living journey!

Website/Blog Recommendations
Tiny House Giant Journey - This gal has basically written a blog post about anything and everything you could imagine when it comes to tiny house living. Not only is her home adorable, but she has video tours of tons of other tiny homes, in-depth posts about budgeting for your build, and soooo much more. Definitely worth a follow!
Tiny House Basics - A great resource for more technical questions like trailer loads and waterproofing. This couple also sells tiny house trailers and shells, as well as having put out their own book (though I haven’t bought a copy yet!), so they’ve got tons of great resources on their website. Follow them on Instagram as well - occasionally they’ll host Live Q and A sessions so you can get any of those little burning queries answered.
Builder’s Websites - Look up tiny house builders in your area and dig around on their websites! This will also help you get in the right budgeting mindset, and it's important to be realistic about that from the outset. Even if you’re planning to build yourself, most builders are trying to sell the tiny house lifestyle as well as their services, so aside from lots of nice inspiration pics of previous houses, a lot of sites also have awesome lists of resources, answers to frequently asked questions about everything from sewage systems to solar panels, and even some good budgeting formulas! And if you are planning to go with a builder, you can never start the search too early. Keep the search range wide - I searched “tiny house builder east coast” instead of “Virginia” because it gave me so many more options to research. If you’re going with a builder or contractor for any part of the process, finding the right, reliable, honest person is the most important, even if it means driving six hours instead of one.

One final recommendation for research/inspiration, which is the only thing I actually paid for while doing research and design*. I was on vacation in the Blue Ridge Mountains, staying in a tiny house AirBnB. There was a well-worn copy of a book on the counter, Turning Tiny, to which one of the homeowners had contributed an essay, along with over 60 other tiny house owners! I read the owner’s chapter and blazed through about 10 more before the weekend was up. She had copies available for only $15, so I snagged one before I left to go home. I’m still only partway through the book but it is already SO worth it. With so many perspectives folded into easily digestible chapters, this book gets you a LOT of bang for your buck, and I tend to go back to it and read two or three chapters whenever I'm feeling doubtful or stressed. It came out two years ago, so you may stumble across some pieces of information that are out of date, but that hasn’t bothered me. You can get it on Amazon for your Kindle for $15, or buy a used hard copy for even less! I also borrowed a huge stack of books from friends and the library to peruse, but when it comes to working towards the right mindset (not necessarily furnishing 1,000 technical details), Turning Tiny is the best book I’ve found. I do also recommend seeing what your local library has in terms of tiny house books. *This book is, of course, not required reading, so I wouldn't necessarily consider this a cost towards my build.
DECISION: Do It Yourself vs. Pay A Professional
Alright, first up, one of the biggest questions that will frame how much your home will cost: DIY Build or Professional Builder?
The old saying goes that for any construction project, there are three key factors: Cheap, Fast, and Good - and you can only pick two.
The old saying goes that for any construction project, there are three key factors: Cheap, Fast, and Good - and you can only pick two. A quick internet search will show that the difference in cost between building yourself and paying a professional home builder is in the tens of thousands. Most people who choose to build their tiny homes themselves are picking ‘Cheap and Good’ - keeping costs low, but likely taking a longer time to complete the build in order to make sure things are done correctly. A professional builder will likely hit the ‘Fast and Good’ markers, but you will be paying a serious premium for those advantages. If you find someone promising all three… I would really dig deep to double check that they’re not shorting you on the quality of the work and actually just hitting those alluring ‘Cheap and Fast’ selling points.
My plans are actually a combination of DIY and professional build, so I feel like I’m getting some element of all three factors, but making a larger sacrifice on the ‘Cheap’ element than most DIY-ers do. One of the things that made the idea of a tiny house so appealing was the concept of building it myself, so that I could understand exactly how everything came together. That way, I would learn a lot more about how to fix things if they break, be able to make additional improvements, but most importantly, to feel a deeper sense of ownership over my home.
That said, I don’t have a location nearby that would allow me to build incrementally over multiple months. I’m also seriously lacking the expertise needed to wire things correctly, install plumbing, properly insulate, and other key elements that really need to be done correctly if I don’t want a whole host of problems. And lastly, I wanted to be able to finish the house and move in as quick as possible so that I could make the transition from rent to loan payments as soon as possible.
How did I find the solution to satisfy all of these needs? Purely by chance. As I was researching imagery of houses I liked, I stumbled upon Incredible Tiny Home's (ITH) website, and found a “Build Your Own” page on their website. Thinking that it was maybe a list of resources for DIY-ers, I clicked through. NOPE. Even better. I found that ITH hosts building workshops throughout the year where you can build your own tiny house in their facility! They provide the materials, tools, and expertise/supervision while you provide the labor. With the help of a few 'build-buddies,' I would do the bulk of my build (about 70-80% complete) through the workshop, saving me more than $7,000 over a custom build option with similar size and options.
I knew IMMEDIATELY that this is what I wanted to do: I would get to be a part of the build process, have experienced builders close at hand to make sure I wouldn’t make any huge or costly mistakes, AND finish a huge chunk of the build within a short period of time. I knew that I would be paying more to work with a professional builder for part of my process, but the extra cost would be well worth the saved time and confidence I would get back. My build dates are scheduled for mid-October, so I will keep you all informed as to how this process goes! [I'm sad to have found out, upon writing this post, that ITH will no longer be offering these workshops, once the currently contracted clients (lucky me, being one of them) have completed their builds. I 100% understand the reasoning, and at the end of the day, sometimes you have to make tough decisions in order to avoid over-stressing staff, and to make a business more efficient. Let's all hope that they'll bring the workshops back someday!]

DECISION: On Wheels vs. On Foundation
This was a no-brainer for me from the outset. My home being on wheels was what made the whole idea appealing in the first place. I immediately loved the idea that I could invest a lot of time and energy and love into my space still knowing that should my life path take me away from Richmond, my home could come with me. BUT I did my due diligence and researched the options.
Don’t get me wrong, tiny homes on foundations are great. I am supportive of minimalist living in all its shapes and sizes. (Speaking of all shapes and sizes - if you don’t know what spite houses are, look into it, I guarantee you’ll get a good laugh.) Having a foundation means that width, height, and weight are no longer major issues! Zoning ordinances are also generally much more kind to tiny residences being built on foundations, so finding a place to build is likely to be easier than finding a place to park your home, depending on where you live.
All that being said, one of the reasons people started putting their tiny homes on wheels was to avoid the cumbersome process of procuring building permits and minimum square footage requirements. When you build on a foundation, in order to declare your house as a legal structure, you also have to submit all of your building, electrical, and plumbing plans to your local permitting office. These permits require processing fees and have the potential to hold up your construction if they have feedback. These systems are in place for a good reason - you don’t want your neighbor’s shoddy renovation to start an electrical fire and burn down your whole neighborhood. As necessary as they are, they mean you end up dealing with a lot of red tape. Some zoning ordinances will even require you to build a larger house if there are no other structures on the property!
But like I said, I wanted to be able to move my home, so this was a no-brainer for me. Tiny home on wheels or bust!
DECISION: Size - length, width, and height
Deciding on the dimensions of your house can be based on tons of factors. Here are some of the questions I asked myself:
Will you be traveling with your home? If not, how often do you plan on moving it, if at all? I really consider Richmond my home, so I don’t plan on traveling with my tiny house on wheels. I would like to be able to move it if I need, but I plan to be stationary most of the time.
Will you need space for a loft? Definitely! I know myself well enough to know that if I have to pull down a Murphy bed or convert a couch into a bed every single day, I would go crazy. Having a separate, lofted sleeping space is crucial for me.
How many people will be living in the house? Just me for now, but a decent amount of room for two people is probably best. And I do love having friends and guests stay over on occasion, so enough room for a sleeper couch is necessary.
What size bathroom are you comfortable with? This one is a bit tricky, because I have always dreamed of having a clawfoot or pedestal bathtub in my home. If my bathroom needs to be large enough to accommodate this, I’ll have to figure out what else I can move into the bathroom so I’m not wasting any space.
How often do you cook, what kitchen appliances do you absolutely need, and which ones could you do without? I love to cook, so a 3 or 4 burner stove and oven, as well as a decent sized fridge are necessary. I don’t need full-size appliances, but one of those tiny double burner stoves and a mini-fridge just aren’t going to cut it. If I have a stove, I can do without a microwave, a plug-in coffee pot, and a toaster. I use my blender and tiny 4-cup Cuisinart pretty often, so I’ll need space for those.
Do you need a work space or office? It would be nice to have a small space to set up my computer, keep some files and supplies, and sit and focus when I need to, but I am not planning on working from home in the near future.
How much storage do you think you’ll need? I’ve already downsized a ton of my possessions, but I went ahead and made a list of the things that take up the most space in my current apartment and decided what I would do with all of them - keep, store, or donate/sell. Through this process, I decided I would definitely need a few places to stash winter clothes, art supplies, and tools. I also figured out that I would need have a place to keep a few pieces of furniture that I won’t have room for but just can’t get rid of - an antique Windsor chair from my alma mater, the dresser I restored by hand, and some art from friends that won’t fit on my walls. But I’m trying hard not to use this storage space as a crutch to keep unnecessary stuff! Also, when in doubt, budget for more storage space than you think you’ll need!
With all of that information in mind, I was able to make a handful of decisions:
If my home would be relocated occasionally but not often, I would still want it to be moveable without procuring special permits. That means 13.5 feet tall at it’s highest point (including the height of the trailer), and 8.5 feet wide at most. I believe the legal limit on trailer length without getting a special permit is 32 feet, but I certainly didn’t need that much space. Most trailers come at the 8.5 foot width, so that was an easy choice. I also decided to go for the maximum height at 13.5 feet, to give me as much head room in the bathroom and loft as possible - I’m no giant, but I’m on the taller end of the female spectrum at 5 foot 8, so the more height the better!
To comfortably house myself and the occasional couch-guest or the potential for a permanent plus one sometime down the road, along with the assumption of a 5 foot long by 8 foot wide bathroom to house my dream bathtub, I guessed that 20 feet would be a comfortable length. Then I found a tiny house vacation rental at that size to stay in for a weekend which helped me solidify my decision - gotta back up my research with an experiment! That means my new home will give me approximately 160 square feet on the first floor, and an additional 48 square feet in the loft, totaling 208 square feet.
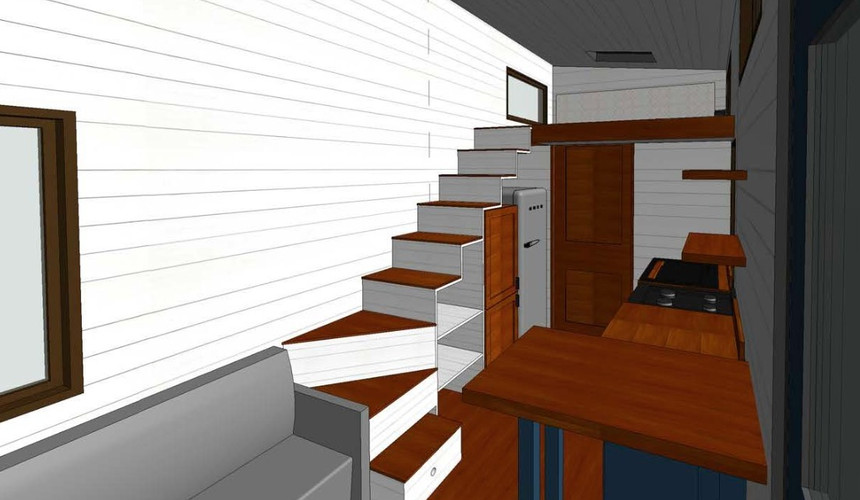
I decided on a galley kitchen style set-up, about 7 feet long, in the middle of the house with a small stove/oven, a full size kitchen sink and two counter sections on one side, then a pantry and 9 cubic foot fridge tucked under the staircase on the other side.
The rest of the space in my ‘great room’ set-up, about 7 feet, would be used for the entry and couch/lounge space, with additional seating at the counter-top where I could sit and work when I wanted.
You may end up needing to ask yourself more questions to be able to nail down what size is right for you and your co-habitants, or your available budget may decide the size for you. But this little questionnaire was the best way to my thought process started! Once I had these decisions made, I was able to move into the fun part: DESIGNING!

DECISION: Design Software
Once I had sketched out a rough layout in a notebook, I wanted to start playing with my design on a computer so I could apply finishes, play around with furniture, and generally see how realistic my design would be in 3D. I looked into three different kinds of software before I landed on Revit. Almost everyone I follow on Instagram who self-designed their houses did so in SketchUp. When I worked in theatre production, a number of my set designers swore by AutoCAD. And at the architecture firm where I work, everything is now done in Revit. Again, almost all of this comes down to personal preference.
SketchUp (free version available through most internet browsers): I started by trying out SketchUp because I had seen that you can get a pretty complete design done through the free version of their software. For me though, it wasn’t intuitive and the toolbox/dashboard was over-simplified to the point that I had no idea where to look for anything! And mostly importantly - the free version of the software is hosted through a browser, so every time my internet went a little spotty, I would get frozen out of my design. I might have liked it more given more time, but I got frustrated pretty quickly and decided to move on to another option after about 45 minutes of effort. BUT I would recommend trying SketchUp out first, because if it jives with the way you work, you can do a lot of cool stuff in there!
AutoCAD (Mac/PC compatible): Next up, I gave AutoCAD a shot. They offer a 30-day free trial for their software so I decided to try it out and see if it would be worth the money. AutoCAD was SO MUCH easier for me to use when building my floor plan. I was even using their iPad app at one point and having a grand ol’ time building and re-organizing my floor plan. Within two days of messing around, experimenting with the software and refining details, I had a fairly detailed floor plan and set of elevations ready to go. I was so proud of myself that I would show them to ANYONE who would give me the time of day! But when it came to viewing a more realistic rendering, I was outta luck. I exported the floor plans I had created and canceled my trial before it charged me.
Revit (only compatible with PCs): I went to Revit last because I was a bit intimidated. My co-workers design full multi-thousand-square-foot buildings and spaces in Revit daily. It can do almost anything you ask it to do, and can get more detailed than you may ever want. I decided to fill an otherwise empty Saturday by going into the office with some good tunes and snacks, where I parked myself at my desk, and gave Revit a shot. Pro Tip: I was able to use my firm’s software package to do my design, but if you are a high school/college/graduate student (or if you have a good friend who is, or if you just still have your college email address), you can download and use Revit for free with an educational license!
I noodled around a bit without any guidance, but kept getting stumped - there are a LOT of tools on that dashboard, and their uses are not all immediately clear. So I took a step back and walked through a bunch of the video tutorials available on AutoDesk's website. (There are also lots of video tutorials available on YouTube.) After doing some basic tests and set-ups, I started building my model. With stopping to take more tutorials, creating extrusions from scratch, and re-creating things that I screwed up, I finished the first model of my design after about 6 hours of work. The next week, I showed my design to a co-worker and asked if he would take the time to walk me through some additional tutorials in exchange for lunch. It’s amazing what a little food bribe can accomplish! One of the greatest things about Revit is that there are hundreds of pre-built pieces like couches, sinks, toilets (even tiny house trailers!) that you can download and drop into your design, along with thousands of finish options like paints, stains, metals, and more that you essentially ‘paint’ over pieces of your model. With a little bit of extra training, you can also import or create your own custom furniture pieces or finishes. With a little help from my co-worker, I was able to build my own closet structure, as well as a custom storage staircase. Revit was able to give me exactly what I was looking for - the ability to build my floor plan in extreme detail, view more realistic 3D renderings and elevations, and the option to import pre-built pieces that were too complex to create myself (i.e. the trailer).


Other Options: A few options that I didn’t explore include: paying a designer to create my tiny house plans for me, or buying a complete set of pre-existing floor plans. Many people will choose to go one of those routes, but if you have even one creative bone in your body, I’d recommend spending a day or two playing around in one of the design software platforms I mentioned. It won’t cost you a dime to try it out, and you may find that you can stretch those creative muscles and save yourself some major dollars at the same time. If you are planning to design then build the home yourself, see if you can hunt down a family member or friend in the design or engineering industry to look over your finished plans as your second pair of eyes. That’s a service that would also be worth paying a bit of money for if you can’t find someone to give you free feedback. My builder is working with me to ensure that what I've designed is feasible and safe. You don’t want to get halfway through your build and find out that the loft you designed and built won’t actually support your weight, that your staircase is too narrow, or some other oversight that could be costly or dangerous.

Next Time:
I hope this post has been helpful for getting you started on your own design, or just to educate you on my process thus far. There are so many decisions that go into designing a house, even when it’s less than 200 square feet, so in an upcoming post, I’ll dig deeper into how I started making more detailed operational design choices! This will include an overview of the pros and cons of on-grid versus off-grid living, propane versus electric, composting toilets versus black water tanks, a deep-dive on where I made sacrifices on space, what appliances I’ve decided I can’t live without, how all of these choices have influence the all-powerful BUDGET, and more!
Catch you next time!